Measure the Time-to-click in Google Analytics
I’ve previously written a post on how to track clicks on internal links and call to actions. It’s really useful to measure which call to actions are actually clicked. But in some cases we might need more details. Such as knowing how long time it takes for our users to place that click. If users are taking a very long time before clicking a primary call to action, we might be able to help them by tweaking the text or our headers. But before we can make that decision, we must be able to measure the time-to-click.
Can’t I just use Time on Page?
Well, yes. The Time on Page metric measures the time between the user entering the page until the user enters the next page. Assuming you have just one call-to-action and link on the first page, the Time on Page metric is sufficient. But that’s rarely the case. Also, if your call to action links to another website, to a downloadable file or a video, the Time on Page metric won’t help you at all.
Why measure the time-to-click?
Ever heard about the 5 second test for landing pages? Basically, if people can’t figure out what your landing page is all about within 5 seconds, there’s a huge chance, they’ll leave it at that. And leave your site. So time is critical.
Which is also why we want people to take action. We do that - mostly - by displaying clear call to actions. “Sign up for free”. “Download your free guide now”. And so on. Call to actions, though, rarely work alone. They’re accompanied by headers, lead texts, images or videos. All with the purpose to get people clicking on that call to action.
Now, if people can’t decode your message very easily, some of them will leave. Others will browse around and loose patience. And some will click your call to action. So the time-to-click (i.e. the time between entering a page until clicking the call to action) can be used to indicate if your page is too difficult to understand. With that said, let’s get measuring!
Meet ‘User Timings’
I’d like you to meet ‘User Timings’. User Timings are similar to Event Tracking in Google Analytics. First of all, it’s a type of hit. Just as an event, a pageview or transactions are hits, User Timings are hits too. They’re specifically made to measure, well, time.
When measuring time in Google Analytics (seconds, minutes etc.) regular events are not precise enough. They do support numeric values in the Event Value field, but only of the type integer - meaning that you can store whole numbers only. And with this kind of tracking, we’d like all the details. Decimals, that is.
Also, it’s best practice. When measuring timings in Google Analytics, you should use the built-in feature for it instead of inventing new ways to do it (like custom or calculated metrics etc.).
What you need
This post is written for Google Analytics implementations done through Google Tag Manager. So you’ll definitely need both of those. And then you’ll need a page with a call to action to measure (duh!). Also, you’ll need five minutes to do this implementation.
Add and configure the trigger
So, in this example, I will measure the time-to-click for a call to action on my own Danish website. I have this huge header followed by a primary call to action:

Since this particular call to action is just a regular old fashioned HTML link (<a>) with a single CSS class attached to it, the corresponding GTM trigger is really simple:

This is a trigger of the “Click - Just Links” type. And I’ve simply set the triggering rules to match the single class of that call to action. The trigger configuration really depends a lot on how your site and particularly your actual call to action is made (in terms of HTML). Read my post on tracking internal links if you’re in doubt.
Calculate the time-to-click
Before we can send the time-to-click to Analytics, we need to actually calculate it. So we need a start time (when the user enters the page) and an end time (when the user clicks our call to action).
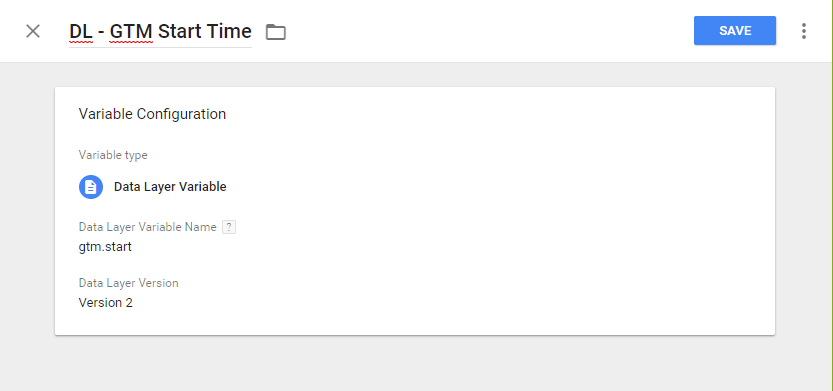
The start time is really easy. It’s actually built into Google Tag Manager as a variable in the dataLayer. So the only thing we need to do here, is to create and configure a new variable of the “Data Layer Variable” type like so:
Now, to measure the time-to-click, we just need to get the current time, and then calculate the difference between the current time and the start time. We do that by adding a new User-Defined Variable of the type “Custom JavaScript”:

You can copy a paste the script here:
function() {
    var date = new Date();
    var timeNow = date.getTime();
    var timeToEvent = (timeNow - {{DL - GTM Start Time}});
    return timeToEvent;
}
This script basically grabs the time at which GTM was loaded on the page, finds the current time of our event and calculates the difference. The difference is outputted in milliseconds. Which is what Google Analytics needs to display the final reports with second metrics.
And now for the tag!
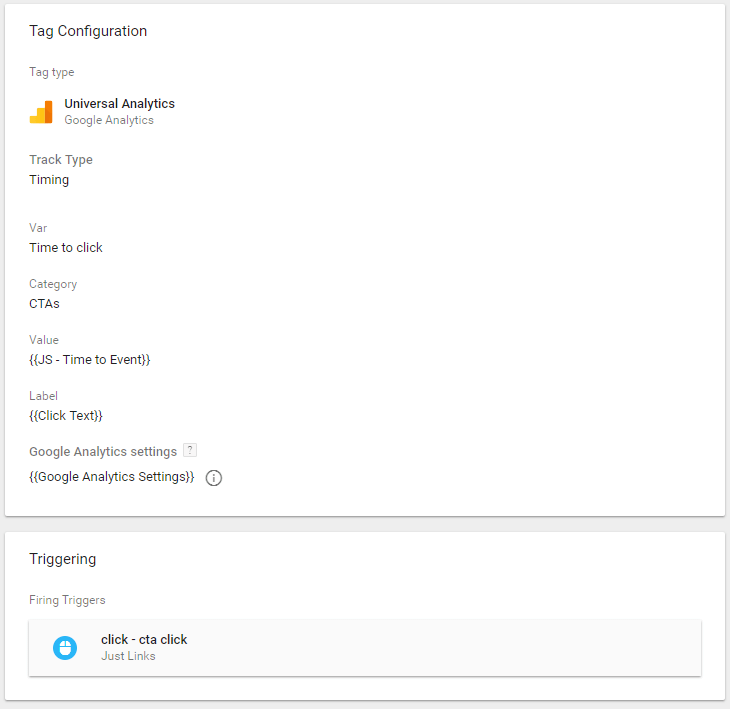
The only thing left to do is to setup the actual Google Analytics tag. So go ahead and create a new Google Analytics tag of the ‘Timings’ type. Depending on your configuration, my tag might look a little different than yours. For instance, I’m using a Google Analytics Settings variable for my tracking ID, and I’ve chosen names for my category, variable and label that you might want to change. The really important thing here is the Value. Notice how I’m referencing the variable we just made:
And that’s it! You’re now ready to measure the time-to-click on your call to actions. Obviously, remember to adapt this to your own setup, and test it. You don’t want to break anything.
Reporting and Analysis on time-to-click
So where do you see the data? Well, easy. Go to Behavior, and then select Site Speed and User Timings. Much like in your Events reports, you’ll now see “CTAs” (the category name you entered in the tag) appear on a row. Click that, and you’ll see the row for “Time to Click” (which corresponds to the “Var” name in the tag). Finally, click that and then you’ll see a list of your tracked elements appearing with their actual “click texts”. Here’s an example report:

Now it’s actually possible to see how much time people take from entering a page to clicking our call-to-action. Of course, this is aggregated data. So as always, you want to segment it - e.g. based on device type, traffic channel or what have you.
But I promise, you will be making much smarter decisions about your website with this!